Handicraft Ideas Home Decorating Step by Step
Decorate your home with these easy, do-it-yourself home décor crafts, we've picked 17 DIY home décor ideas (Popsicle shelves, Paper lantern centerpiece, Seashell Candles, Crystal Chandelier and more…) that can make you home unexpectedly awesome place. So without any delay of time, let's get started.
Beautiful Home décor DIY Crafts
Home décor ideas have become a staple today. We wish to revamp our home décor every now and then. Latest and trendy designs to decorate your home are very important to keep up with the changing times and to give your home a fresh feel every now and then. We have brought to you some of the latest home décor crafts. All of these are easy to make and look very beautiful. Their addition to your home will make your home look more and more beautiful.
1. DIY Seashell Candles

Materials:
- Sea shells
- Wax
- Candle wick
- Heating arrangement
Procedure:
This is a very beautiful and easy to make home décor idea. You can start by collecting some sea shells. This would be a great idea if you are near a beach or you can buy shells online. Now take some wax. You can add colour to it if you want. Heat the wax. Now take a candle wick and place it at the base of the shell. Pour the hot wax in the shell and let it solidify. You will have great shell tealights.
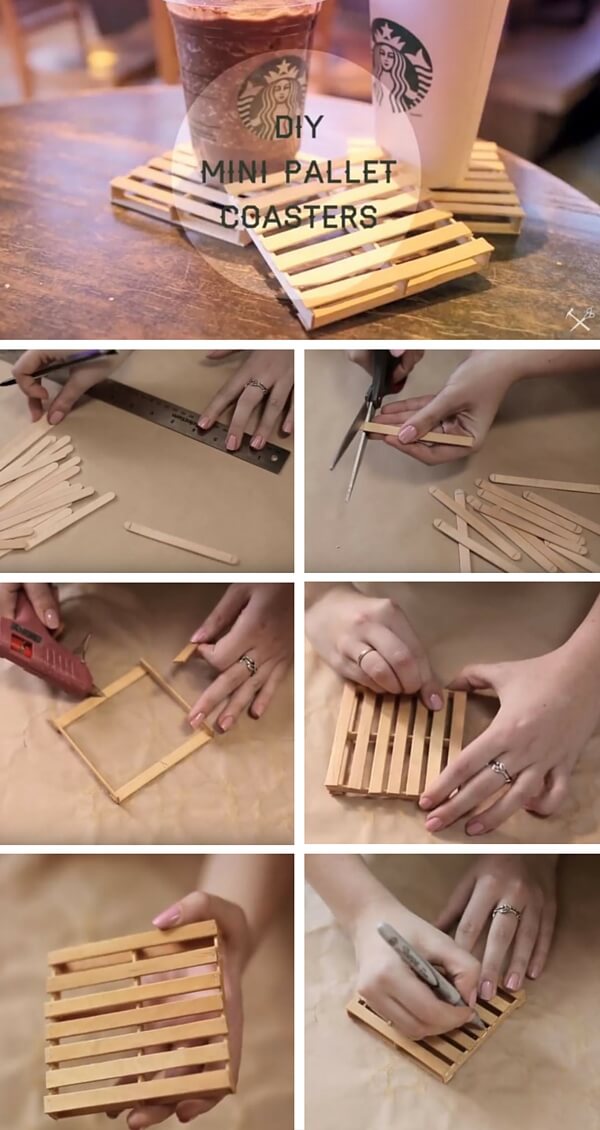
2. DIY Mini Pallet Coasters
Material:
- Wooden slits
- Super glue
- Marking tools
Procedure:
For these mini pallet coasters, cut out the end of the wooden sticks so that they are flat. You can also use popsicles for the same. To keep the length of all the sticks equal, you can use marking tools. If the length is not equal then it will be uneven and can result in failure also. Then equally align these strips on a flat surface, and use super glue to join them with three sticks placed vertically. Then mark the points and join equal no of sticks on the top. This will provide both strength and support to the structure.
3. DIY Succulent Pod & Organizer Bookends

Material:
- Wooden panels
- Pebbles
- Humus
- Succulents
- Super glue
Procedure:
Keeping your books sorted without any shelf can be a tough task, as you have to keep them on one another. Thus making the lower books access tough. To avoid this you can craft your own Succulent Pod & Organizer Bookends. For this craft idea, Join the wooden panels with any rigid partition block as shown. Then keep the succulents on one block with pebbles and you can keep stationery items in another. The pebbles are used to provide weight to the structure so that they are not easily moved by the books.
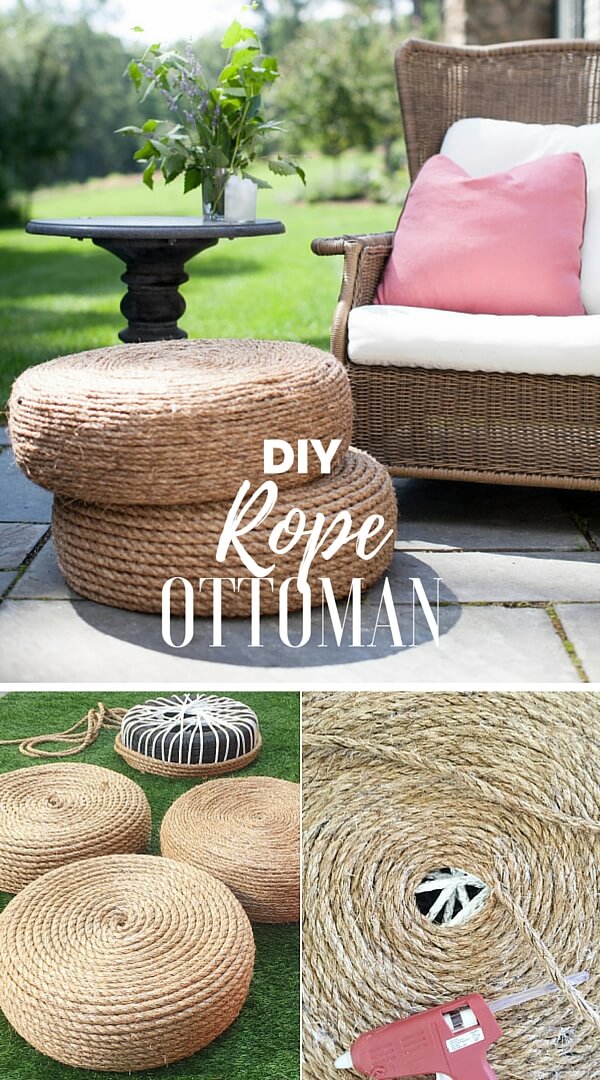
4. DIY Tire and Rope Ottoman
Material
- Old tire
- Jute rope
- Superglue/ glue gun
- plastic ropes
Procedure:
To craft your own ottoman, wrap any old tire with plastic ropes properly as shown in the image. Make sure the ropes are tied properly and with strength. Then with the help of glue gun in one hand and jute rope in another, cover the tire going upwards. You can start from the bottom center or from the side middle. Try that there is no space left uncovered and the glue is used evenly all around between the jute rope and tire.
5. DIY Canvas String Art Graffiti

Material:
- String
- Tape
- Canvas
- Spray paints in different colors
- Scissors
- Masking tape
Procedure:
Take a canvas board and make a pattern on it with the help of strings and tape. Make sure that the string isn't loose and there is no space between the board and the string. Then use spray paint randomly as shown in the images. Don't make the board too wet with paint. Also, maintain the distance between the spray nozzle and the board. Then remove the strings and write your message with the black paint.
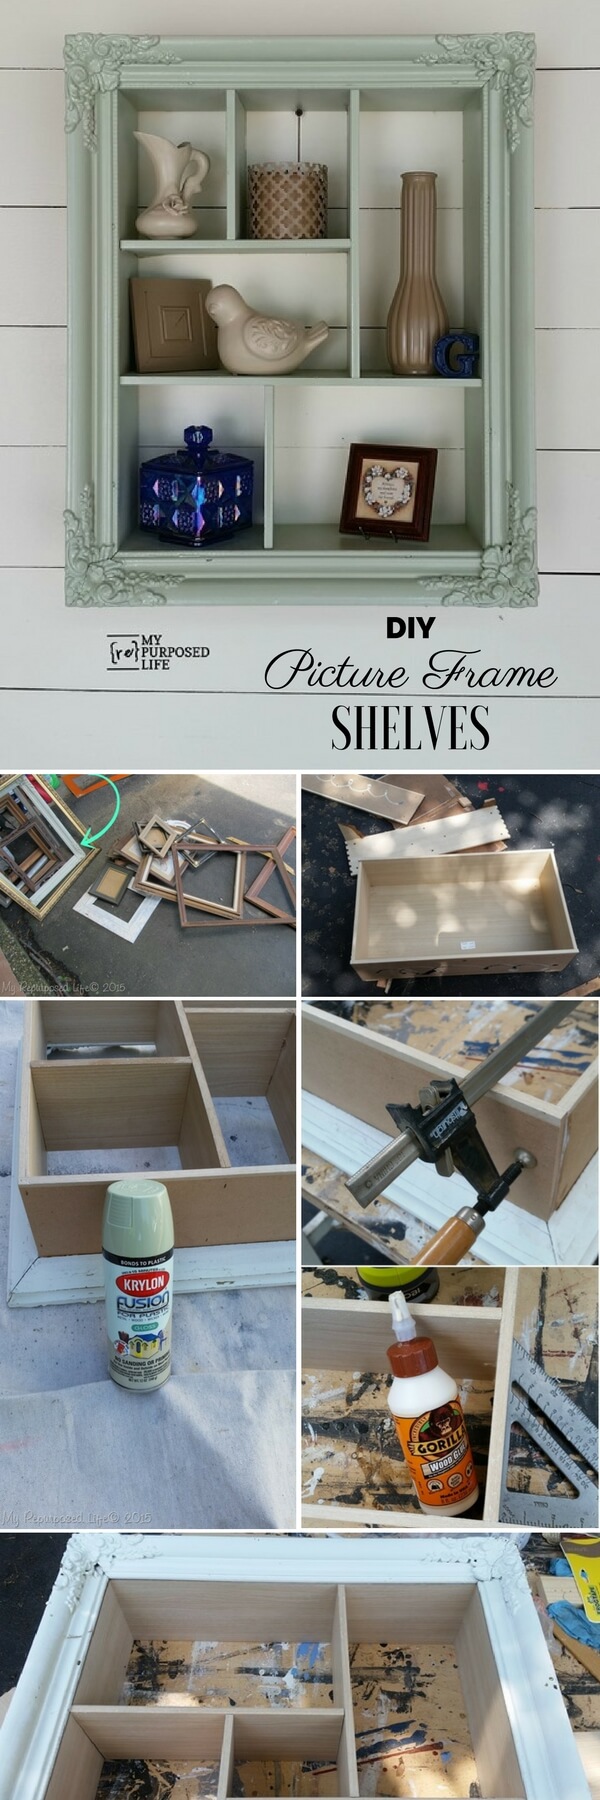
6. DIY Picture Frame Shelves
Materials:
- Wooden panels
- Cutting machine
- Super glue
- Paint
- Frames
Procedure:
One of the most brilliant DIY project which makes your décor all the more sophisticated. You can start off with wooden panels. Clean them and sand paper the edges to avoid lint while working. Nail the panels to each other at right angles. You can use super glue in addition to the nails. Paint the show case once completed. You can add beautiful frames and wooden beads to the edges of the show case once complete. This adds more beauty to it.
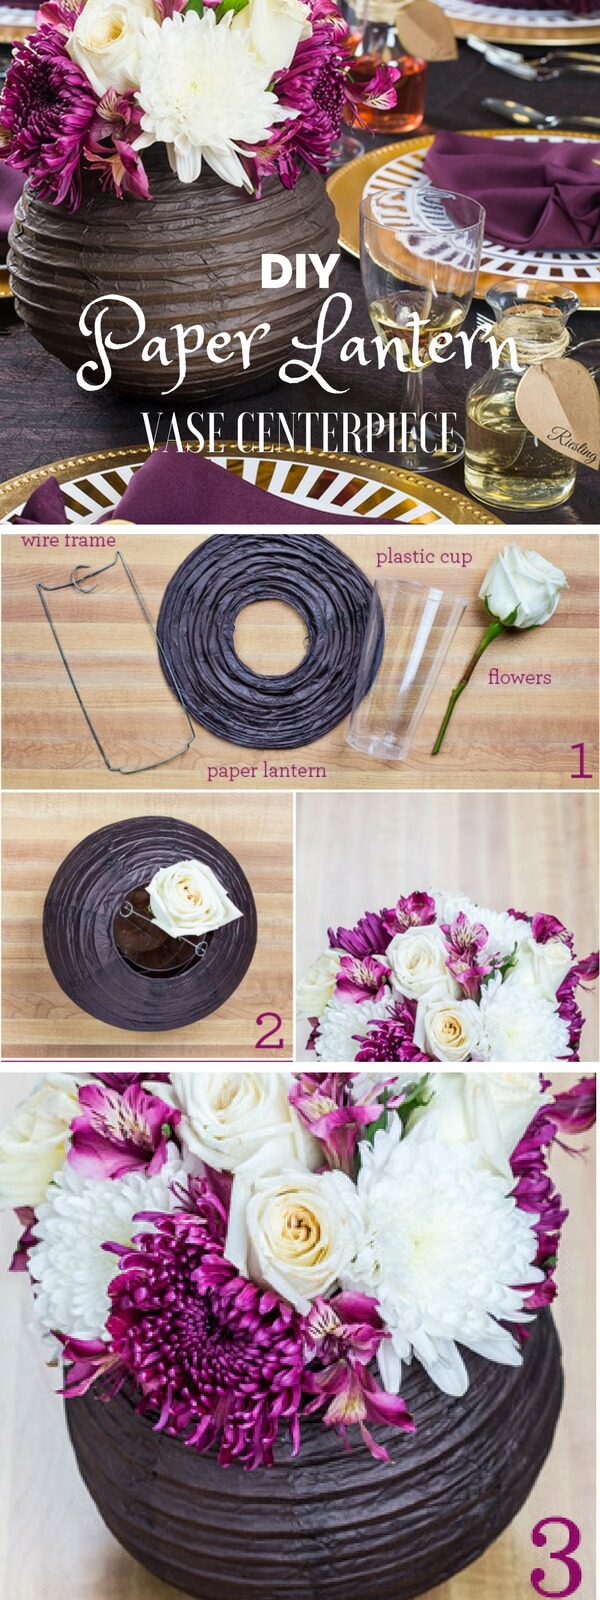
7. DIY Paper Lantern Vase Centerpiece
Material:
- Plastic cup
- Wireframe
- Paper lantern
- Fresh flowers
Procedure:
This simple DIY project adds a rustic centerpiece that's full of charm. Take a lantern and keep a plastic glass just in the middle of it. Use wireframe to support the structure so that it can withstand the weight of the flowers. Fill the plastic glass with water to keep the flowers fresh for a week. Then start putting flowers with equal stems and total lengths one by one starting from the center. You can use flower of different colors and match the shades according to require contrast.
8. DIY Gold Metallic Letters
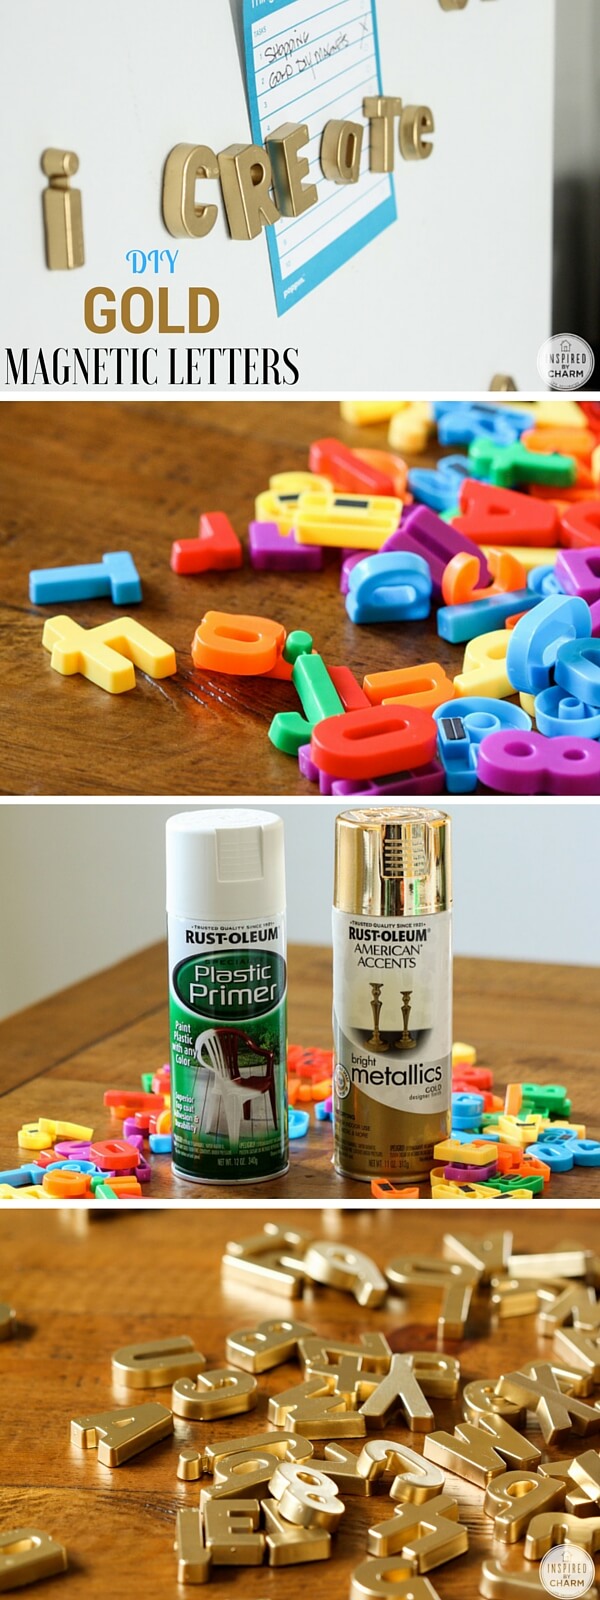
Material:
- Plastic letters
- Primer
- Gold paint
- Magnets or other adhesives
Procedure:
This tutorial shows how cheap plastic letters turn into magnetic letters using spray paint. You can find plastic letters and above material easily in the market. The priming of the letters ensures better adhesion of spray paint to the surface, which increases durability, and also protects the material. Thus, there must be a habit of applying primer before painting any metallic or plastic surface. After the primer, spray gold paint evenly on the letters. Using spray paints requires a uniform amount of spray from an appropriate distance. Provide a proper adhesive at the back of the letters. You can go with magnets if you want to put these letters up on the fridge or use a backing tape to stick them onto the wall.
9. DIY Glittery String Snowballs
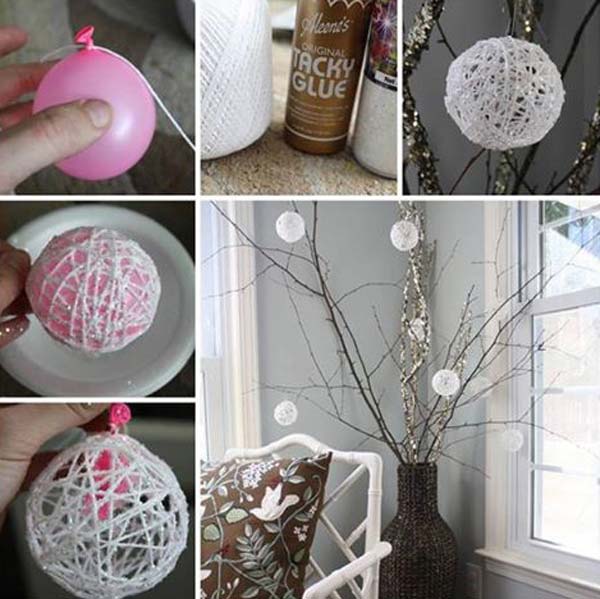
Material:
- Balloons
- Yarn
- Glue
- Glitter
Procedure:
DIY Cool project to décor home on Christmas. To craft the glittery string snowballs, blow a balloon with air and tie it at the required size. Then use glue and water solution to wrap the balloon with white yarn properly. Dip it in the glue water solution bowl for complete cover. Let the piece dry properly such that it becomes rigid and strong. Then burst the balloon and spray glitter as required. Hang these sweet yarn balls on your Christmas tree this Christmas.
10. DIY Himmeli Geometric Sculpture
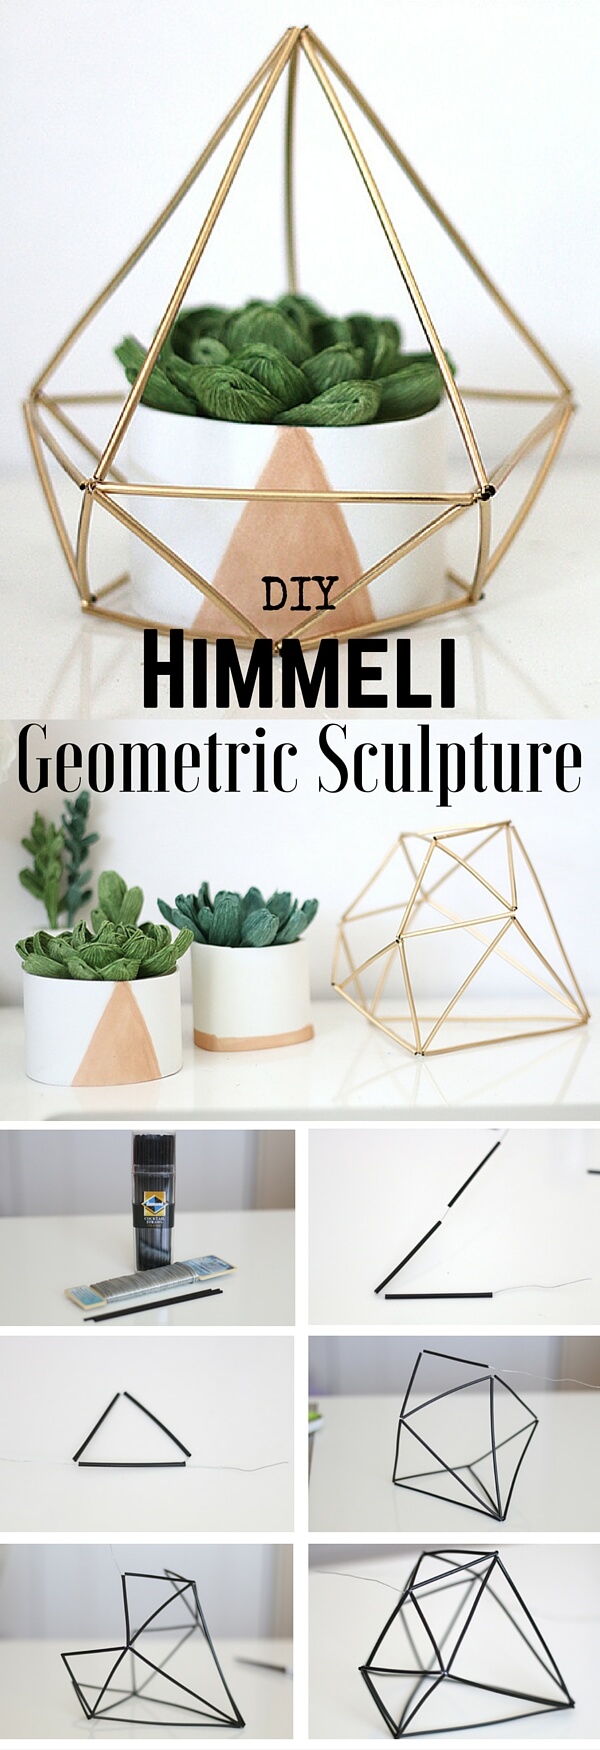
Material:
- Plastic straws
- Metal wire
- Black/ gold spray paint
Procedure:
This geometric sculpture project is an easy way to add shapes and metallic features to your display. A base is used as the foundation in the world of craft. So, start with the base by forming a triangle. The edges towards the upper can be of more length than the base edges. So, use only two lengths in this structure. All the pipes joining at the top point can be of longer length and all the bottom edges can be of smaller ones. Now pull the metal wires together. Tie the metal wires at the top. You can use this beautiful atructure as a hanging or a show piece on your book shelf.
11. DIY Hanging Shelves

Material:
- Wooden planks
- Rope
- Metal rings
Procedure:
This is the perfect project to add some storage, Although there's more sense in only making display of these nice little shelves. Punch through holes at the four ends of the rectangular wooden plank at equal distance from the vertices. Then pass one thread from one ring and tie the thread from the middle. Similarly, do the same on the other ring. Now pass the four thread ends from the four edges and tie a knot at the end after it. Now drop the plank while holding the two rings together to confirm the symmetry, if not then readjust the threads. You can use glue at the ends of the thread at last for permanent joints.
12. DIY feather pendant
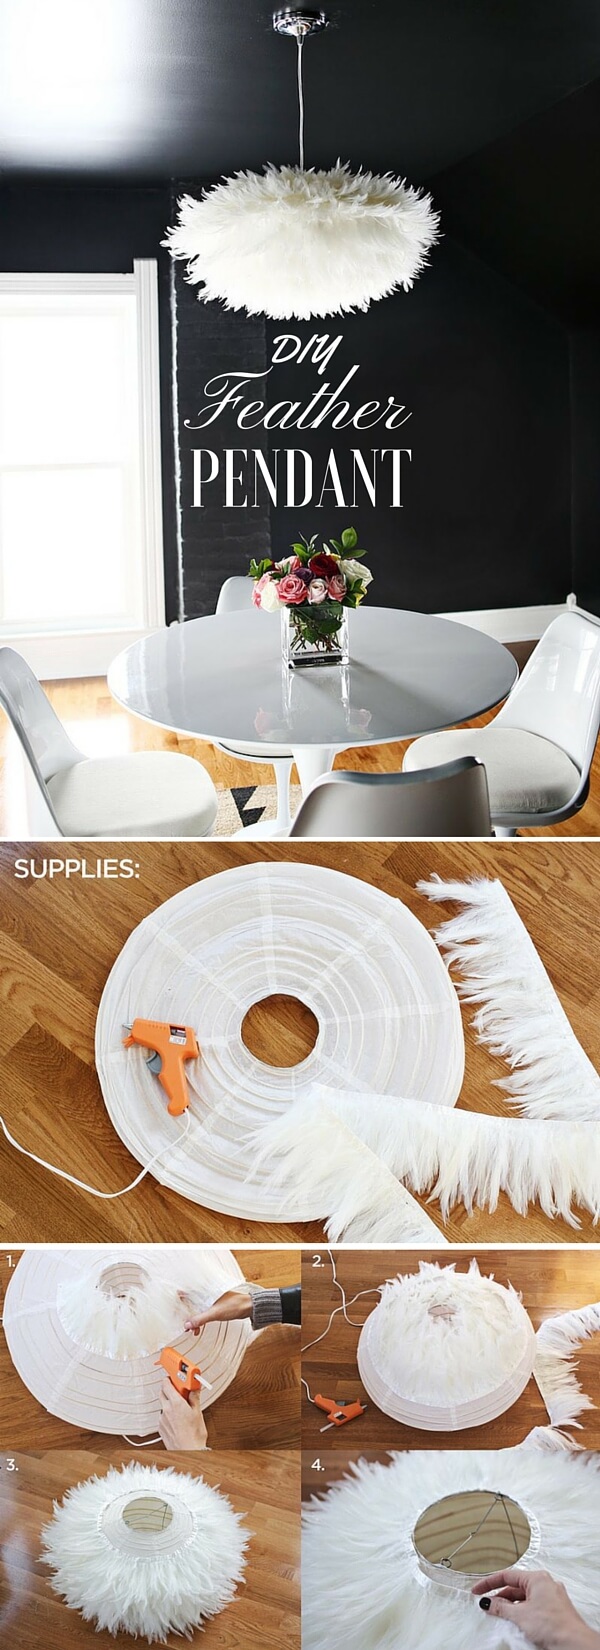
Material:
- Paper lantern
- Feather ribbon
- Wireframe
- Glue
- Yarn
Procedure:
This DIY feather pendant will make a great statement nonetheless. On the inflated paper lantern, without a wireframe, make circular loops with the yawn. You can use a glue gun or super glue to join them. Then expand the lantern and provide a strong wireframe to it. Then, on each loop, cover it with long feathers one by one starting from the bottom and going upwards. This way you will spiral up the whole length of the paper lantern with the feathers and now you can hang it down from the ceiling using a strong yarn piece.
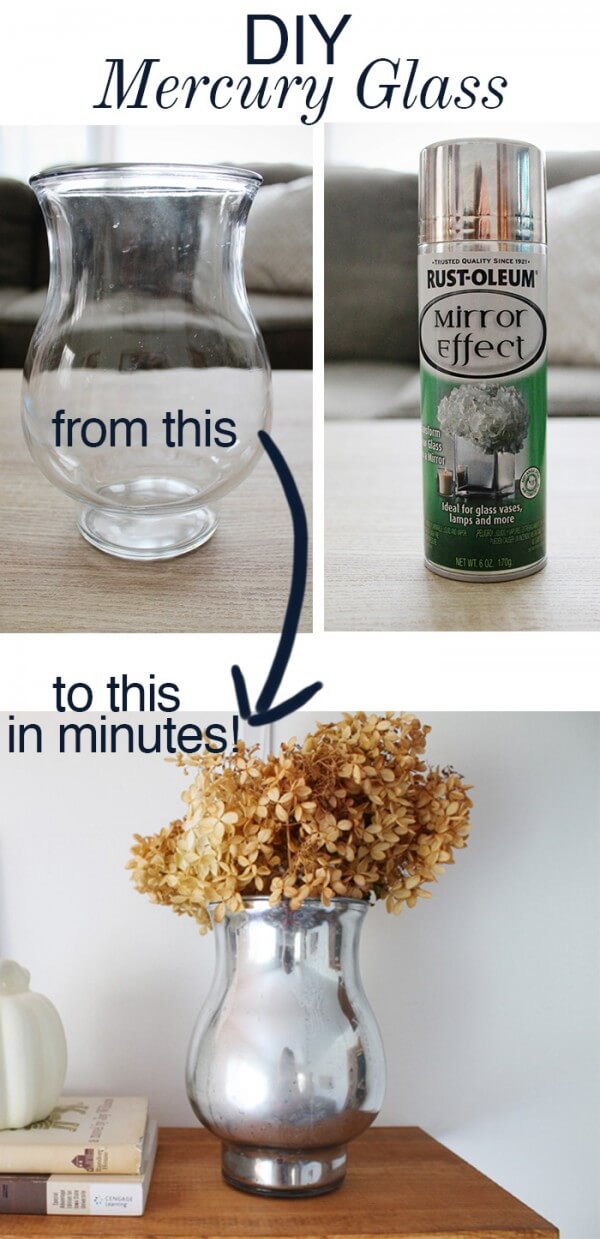
13. DIY Mercury Glass Vases
Material:
- Glass vase
- Rust-Oleum SpecialtyMirror Effect Spray Paint
- Fresh flowers
Procedure:
For this amazing mercury glass vase, take a simple plain glass vase of transparent material. Spray Rust-Oleum SpecialtyMirror Effect Spray Paint properly and evenly on the glass vase. Keep it to dry for a few minutes and at last decorate the vase with flowers as shown in the image. You need a glas vase and mercury spray paint for tjis DIY project. Take a glass vase. Wash it thoroughly and dry it. Now using a mercury spray paint, cover the whole area of the vase with the spray paint. You will get a glossy finish at the end. The vase looks great when you add some fresh flowers to it.
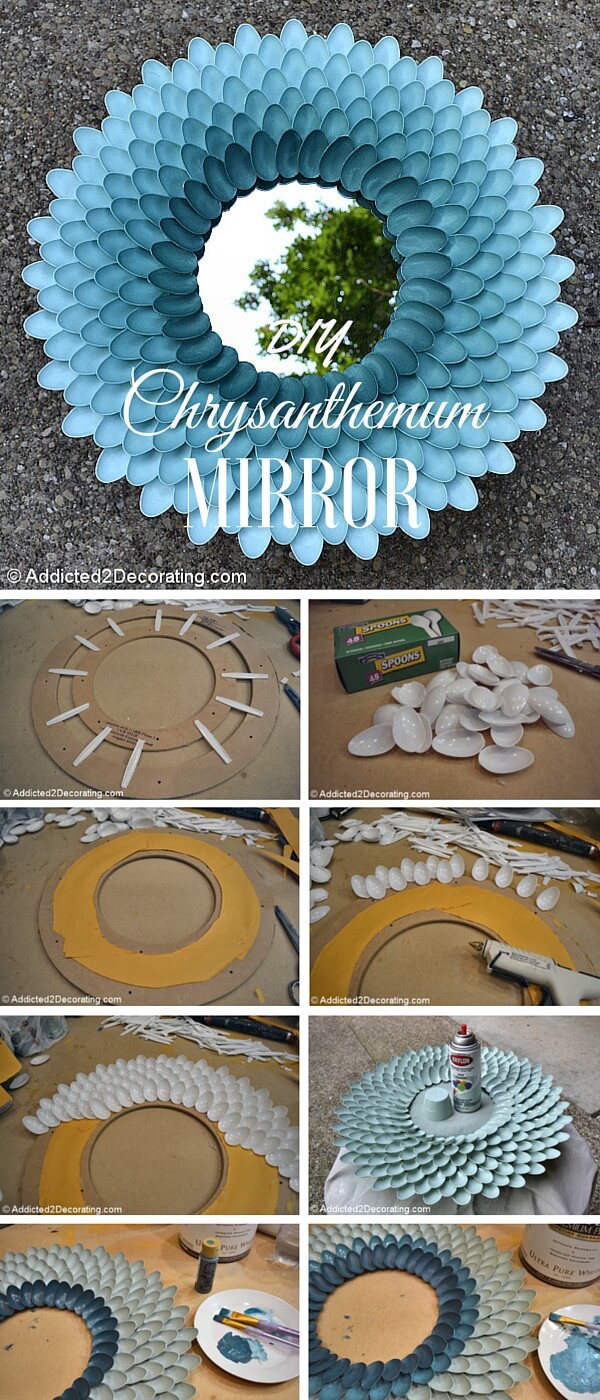
14. Decorative Chrysanthemum Mirror from Plastic Spoons
Material:
- Old plastic spoons
- Spray paints
- Cardboard
- Super glue
Procedure:
This chrysanthemum decorative mirror takes just a bunch of plastic spoons and some spray paint – the result are unexpected. This is a very beautiful and bright mirror panel DIY project. Start off by making circular design on the cardboard piece. Mark the inner portion as per the dimensions of the mirror. Cut the heads of the old spoons. Once you have severed all the spoon heads, start aligning the spoon heads along the inner most marking moving outwards. When you have pasted all the spoon heads, or covered up all the area, paint the spoon heads in a base colour. Now take a darker shade and cover the middle layer, and the innermost with the darkest shade of all. Use spray paints for this. Secure the mirror in the middle of the spoon DIY. You get a beautiful mirror panel for your home.
15. DIY Crystal Chandelier

Required Material:
- Metal wire
- Silver metal balls
- Silver paint
Procedure:
This easy to make chandelier is the cheapest idea to décor home. This chandelier requires a steel framework to cover an existing light. You can buy a metal mesh or make one on your own if you know some welding techniques. Now collect some thin metal wire and some salves balls. Thread the balls through the metal wire. If you are unable to get some silver balls, you can paint the balls using silver spray paint. Now wind this wire on the metal body of the chandelier. This way you will have a great beautiful chandelier design for your living room. Stick it onto the ceiling using super glue and make sure it won't fall.
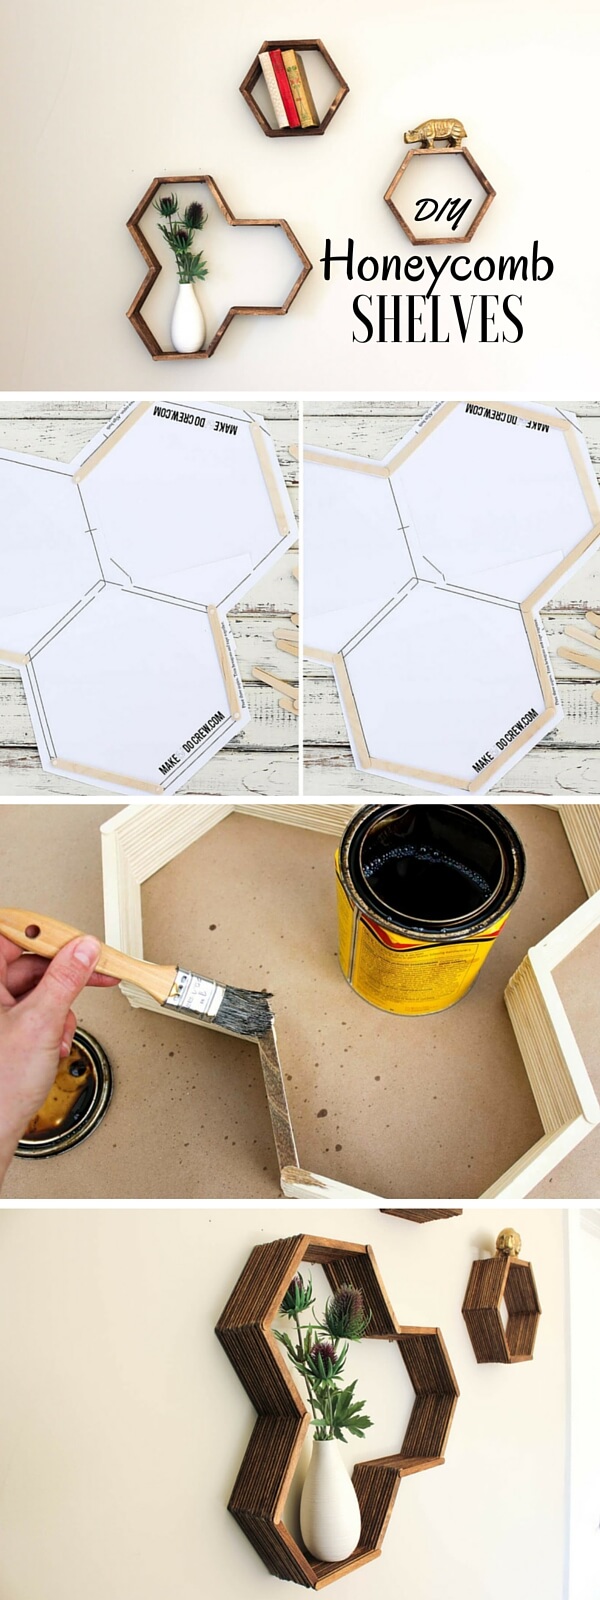
16. DIY Honeycomb Shelves from Popsicle Sticks
Material:
- Popsicles
- Brown paint
- Adhesive
Procedure:
All you need is a bunch of Popsicle sticks for this project. Make these small honeycomb shaped shelves for wall display. All through the summer eat a lot of ice creams and collect all the popsicles. When you have collected a lot of popsicles, you can start with this beautiful DIY project. First of all make a frame on a piece of paper. Cut along the outer lines. Paint the popsicles. Align the popsicles on the outer edges. Make a stack with the popsicles on top of each other to get the desired height for your shelf. While stacking make sure you use enough glue to make the bonds secure. Once you are happy with the height of the stack, stop adding more popsicles. Stick it on to the wall and keep your valuables on your DIY shelf.
17. DIY Make an Interesting Art Piece Using Tree Branches

Material:
- Wooden Sticks
- Pink and white paint
- Paint brush
- Cardboard
- Thin thread/yarn
Procedure:
This is a beautiful craft idea to add a heart shape using wooden sticks. First of all collect some wooden sticks and align them on a cardboard piece on which a heart shape is made. Size the sticks accordingly. Now start painting the sticks in Ombre. Using white and pink paints. Once the sticks dry, start tying thin thread onto them. Now hang these sticks in the heart shape on a larger wooden stick. Hang it on a wall in your home.
We hope you liked these beautiful DIY home décor crafts. All these beautiful crafts are bound to make your home a happier place to live in. Share your feedback with us in the comments section below. Check out other related articles at K4 Craft. We will come up with more such content soon. Keep smiling and creating with K4 Craft!
You'll Also Like:
- 25+ Beautiful DIY Decoration Step by Step Tutorials
- 10+ Wall Hanging Ideas to Decorate your Home
- 15+ Stunning DIY Paper Lanterns and Lamps
Handicraft Ideas Home Decorating Step by Step
Source: https://www.k4craft.com/home-decor-crafts/